BusinessWorks 5.x happens to be quite capable when it comes to securing HTTP calls although setting up security can be somehow challenging.
BW supports several security mechanisms and protocols, among which:
- HTTP authentication
- SSL/TLS encryption (server certificate)
- Mutual authentication (client certificate)
- Proxies
- WS-Security (for SOAP/HTTP protocol)
- Etc.
In this article, we will focus on the first four mechanisms and illustrate how to apply these to a SOAP Request Reply activity. Setting up WS-Security is a little more complex and would need to be explained in a dedicated article.
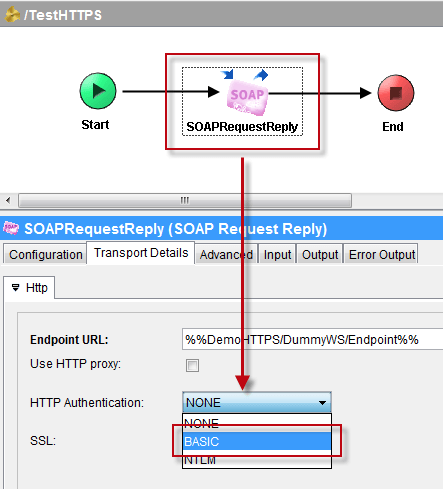
Configuring HTTP basic authentication
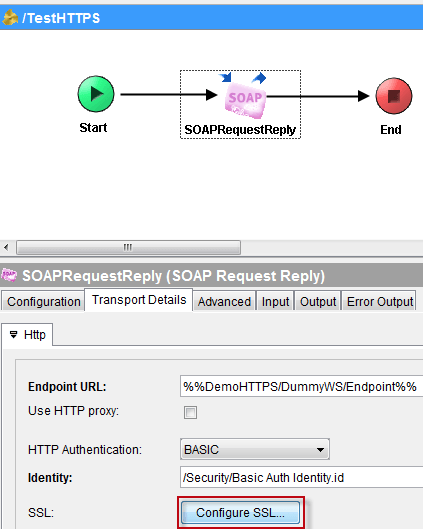
To configure HTTP basic authentication, select the Transport Details > Http tab of the SOAP Request Reply activity and set the HTTP Authentication mode to “BASIC”.
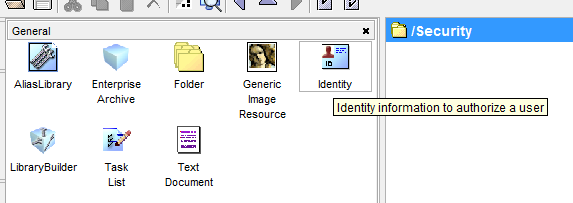
Create an Identity resource from the General palette.
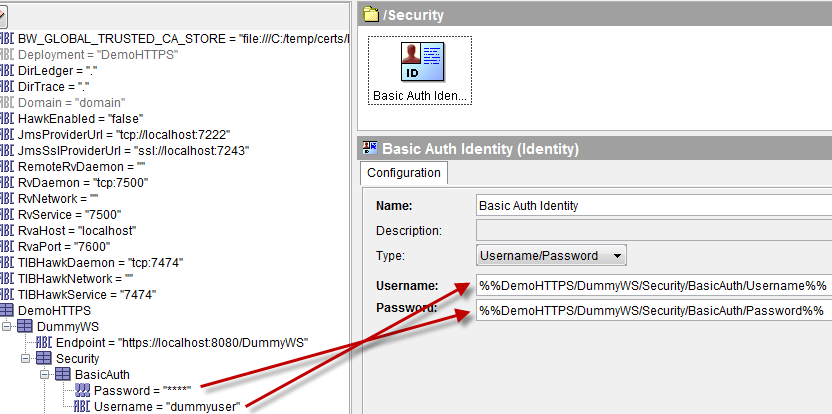
Set the Type property to “Username/Password” and bind the Username and Password fields to two global variables. These credentials must correspond to an account authorized to access the remote HTTP server.
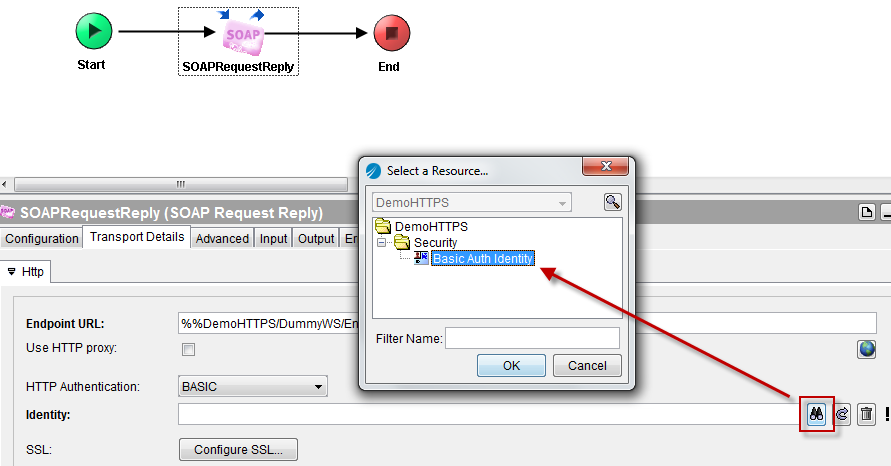
Go back to the Transport Details > Http tab of the SOAP Request Reply activity and select the previously created Identity resource.
Setting up SSL/TLS encryption (server certificate)
In order for the SSL/TLS handshake to be successful, the entire certificate chain (from root CA to server cert) should be downloaded. The certificate chain can be downloaded by issuing the following OpenSSL command:
openssl s_client -showcerts -connect <host>:<port>
The output should be cleaned up to keep only the BEGIN/END CERTIFICATE blocs.
-----BEGIN CERTIFICATE-----
MIID8DCCAtigAwIBAgIDAjqSMA0GCSqGSIb3DQEBCwUAMEIxCzAJBgNVBAYTAlVT
MRYwFAYDVQQKEw1HZW9UcnVzdCBJbmMuMRswGQYDVQQDExJHZW9UcnVzdCBHbG9i
...
F4mmk2xcpMy48GaOZON9muIAs0nH5Aqq3VuDx3CQRk6+0NtZlmwu9RY23nHMAcIS
wSHGFg==
-----END CERTIFICATE-----
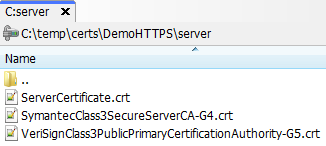
The downloaded certificates can either be merged into one single file or split into separate files (the extension doesn’t matter). These files must be dropped into the server certificate folder, which can be any directory accessible by the BW application using the file:// protocol.
NB: most OpenSSL versions don’t support proxy configuration so this command will only work if the remote host is resolvable from the workstation.
In the BW application, it is highly recommended to use the BW_GLOBAL_TRUSTED_CA_STORE global variable which defines the path to the previously defined server certificate folder. This allows for updating the certificates at a later time without deploying a new version of the EAR (although a BW engine restart will be required).
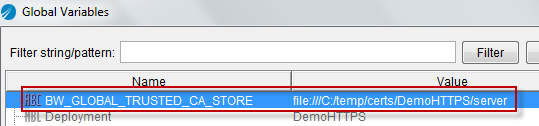
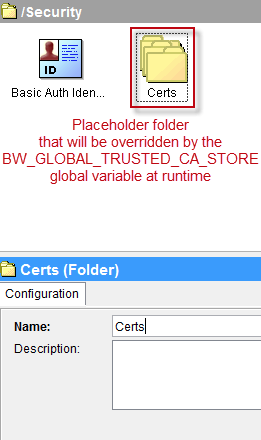
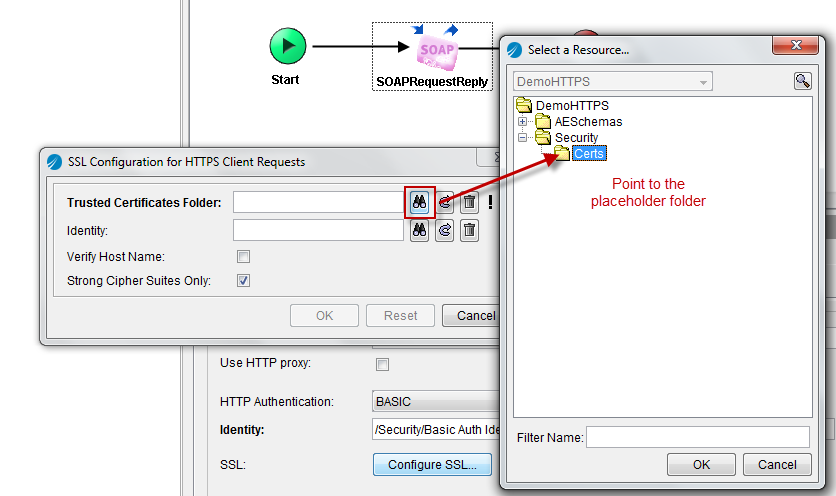
At runtime, this global variable will override the SSL configuration’s Trusted Certificates Folder (which we will see below) but it is necessary to create a placeholder folder to avoid project validation errors.
HTTPS configuration options are available from the Configure SSL button of the Transport Details > Http tab of the SOAP Request Reply activity.
NB: this button is only available when the resolved endpoint URL starts with https:// and remains grayed out otherwise.
From the SSL Configuration window, set the Trusted Certificates Folder to the previously created “Certs” placeholder folder and click OK.
The web service can now be invoked using the https:// protocol.
On a side note, it should be mentioned that TLS v1.1 and v1.2 is only supported with Java 8. Make sure you have the right JRE version if you want to use a TLS version higher than 1.0.
Enabling mutual authentication (client certificate)
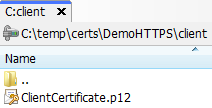
Similarly to server certificates, client certificates (such as PKCS #12 files) should be put in a directory accessible by the BW application.
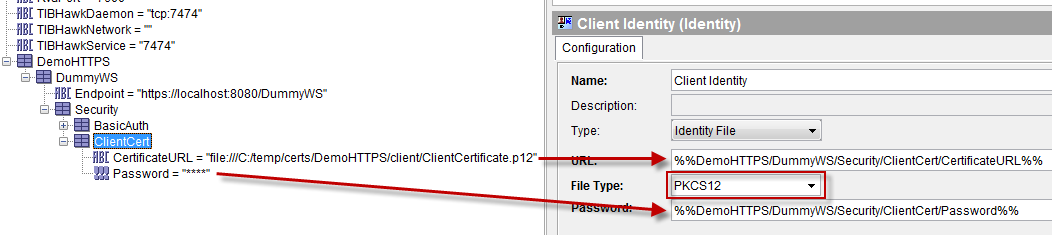
Create a new Identity resource and set the Type property to “Identity File”.

Bind the URL and Password fields to two global variables.
- The URL property corresponds to the previously defined client certificate folder and should be written with the file:// protocol notation (e.g. file:///C:/temp/… please note the triple / after file:).
- The File Type property corresponds to the type of certificate (in my case PKCS12).
- The Password property corresponds to the certificate’s password.
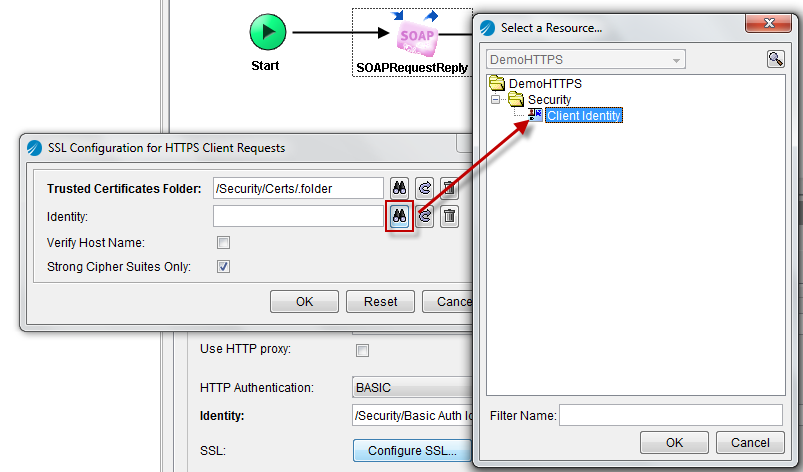
Go back to the Transport Details > Http tab of the SOAP Request Reply activity and click again on the Configure SSL button. The Identity property allows for configuring mutual authentication. Select the previously created Identity resource and click OK.
Mutual authentication is now enabled.
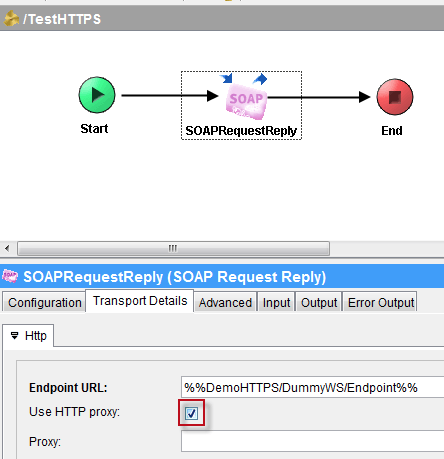
Adding a proxy configuration
When running the BW engine (or Designer tester) from behind a proxy, it is necessary to set up a proxy configuration.
Go back to the Transport Details > Http tab of the SOAP Request Reply activity and check the Use HTTP proxy box. Leave the Proxy field empty for now.
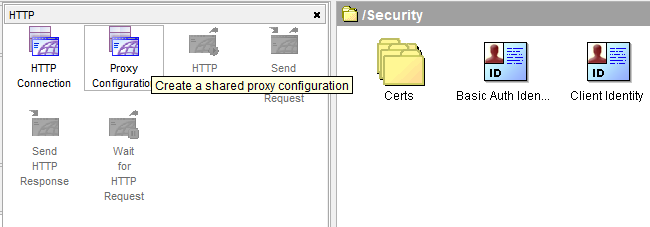
Add a Proxy Configuration resource from the HTTP palette.
Bind the Proxy Host and Proxy Port fields to two global variables and set the Proxy Authentication type to “BASIC” (if applicable). Leave the Identity field empty for now.
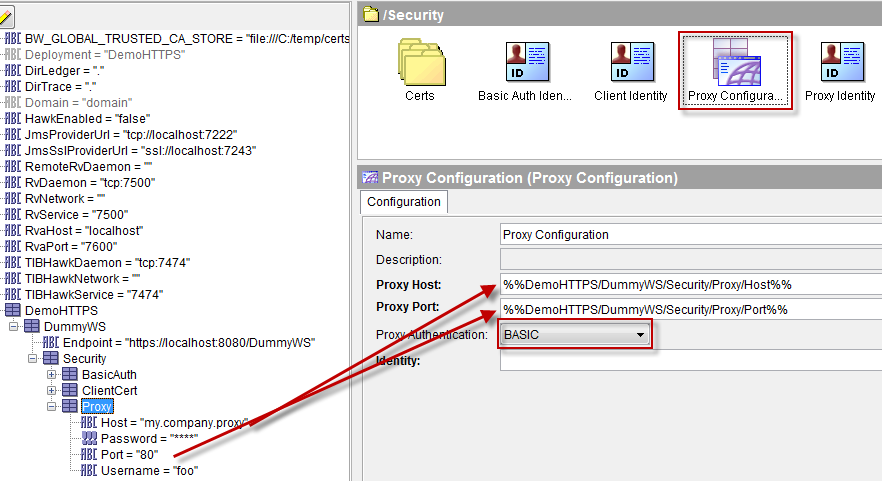
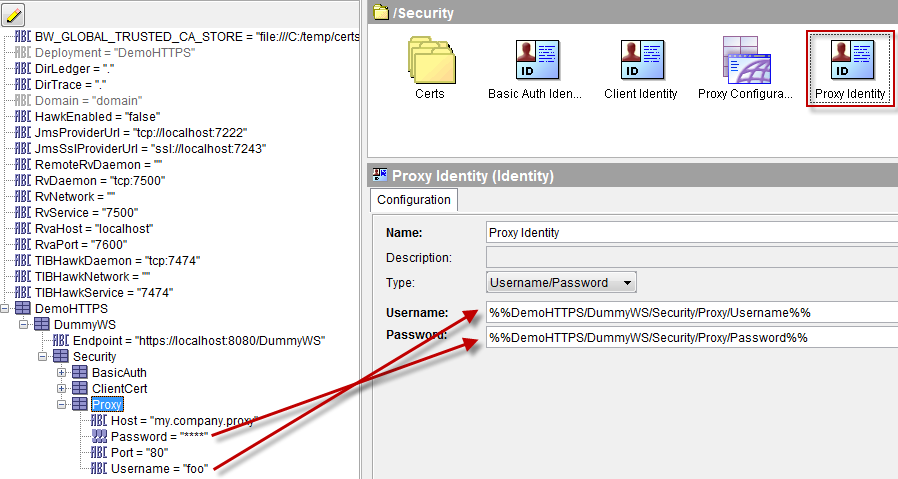
Create a new Identity resource (yes, AGAIN!), set the Type property to “Username/Password” and bind the Username and Password fields to two global variables. These must correspond to an account authorized to connect to the proxy server.
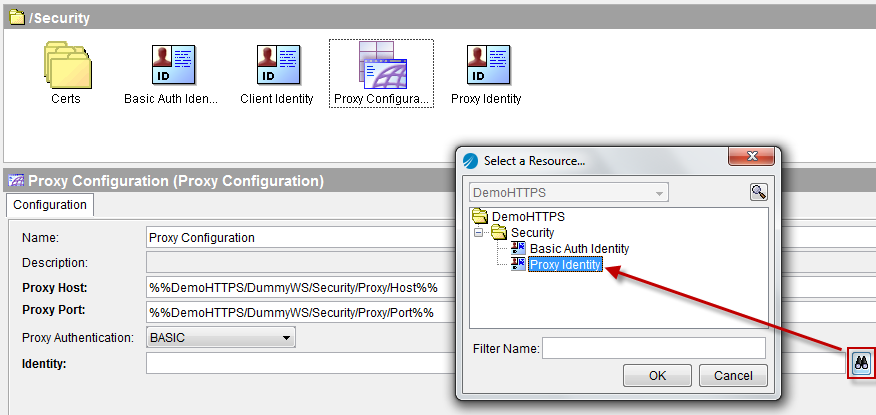
Go back to the Proxy Configuration and make the Identity property point to the previously created Identity resource.
Go back to the Transport Details > Http tab of the SOAP Request Reply activity and make the Proxy property point to the previously created Proxy Configuration.
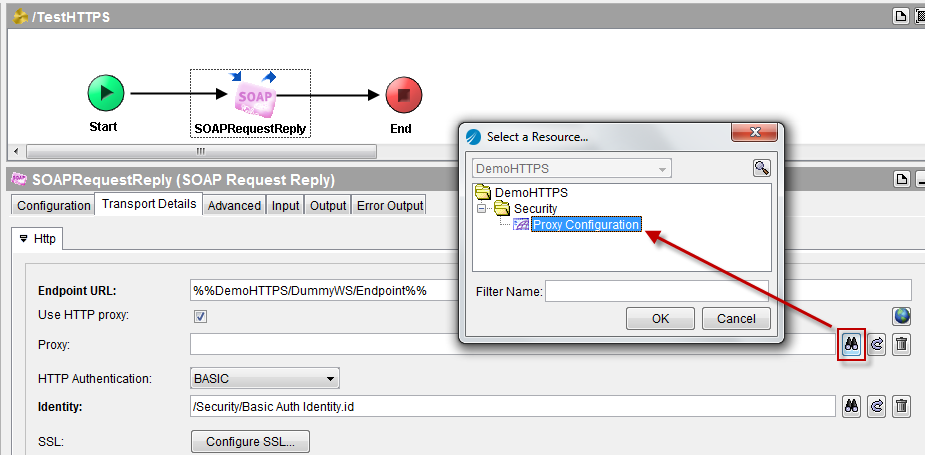
From now on, every request fired through the SOAP Request Reply activity will go through the proxy.
Conclusion
This screenshot synthesizes all the security elements configured through the previous sections.

Don’t hesitate to leave comments if you have questions or need further clarification on specific topics.
